为自己开始一个反思的空间,反思自己的想法,证明自己所说的是否正确,也因为马克吐温说过:让我们陷入困境的不是无知,而是看似正确的谬误论断(What gets us into trouble is not what we don't know. It's what we know for sure that just ain't so.)
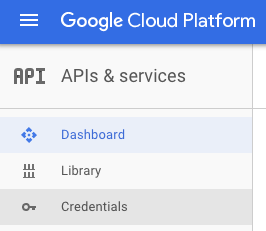
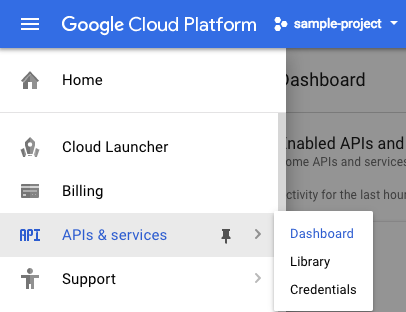
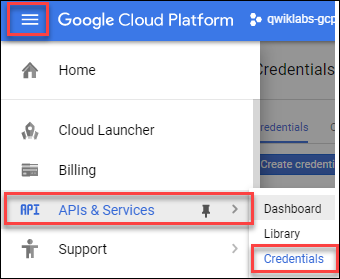
Since we'll be using curl to send a request to the Translation API, we'll need to generate an API key to pass in our request URL. To create an API key, navigate to APIs & services in the left menu and click on Credentials:
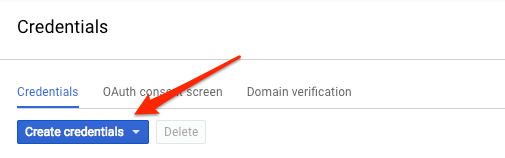
Then click Create credentials:
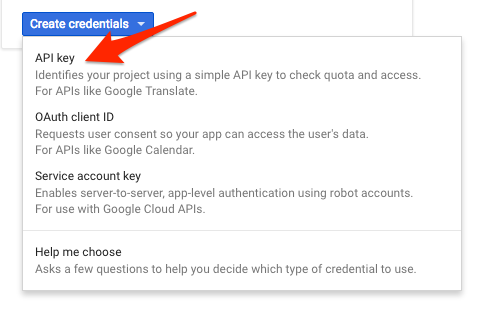
In the drop down menu, select API key:
Copy the key you just generated.
Next you'll save it to an environment variable to avoid having to insert the value of your API key in each request.
Run the following in Cloud Shell. Be sure to replace <your_api_key> with the key you just copied:
export API_KEY=<YOUR_API_KEY>
Translate Text
In this example you will translate the string "My name is Steve" into Spanish.
Pass the text to be translated, along with the API key environment variable, to the Translation API with the following curl command:
{"data":{"translations":[{"translatedText":"Mi nombre es Steve","detectedSourceLanguage":"en"}]}}
In the response, you can see that the translated text and the source language that the API detected.
Detect Language
In addition to translating text, the Translation API also lets you detect the language of the text. In this example you will detect the language of two strings.
Pass the text to be examined, along with the API key environment variable, to the Translation API with the following curl command:
The languages returned by this sample are "pt" and "ja". These are the ISO-639-1identifiers for Portuguese and Japanese. This list of languages supported by the Translation API lists all the possible language codes which can be returned.
Since you'll be using curl to send a request to the Speech API, you'll need to generate an API key to pass in your request URL.
To create an API key, navigate to:
APIs & services > Credentials:
Then click Create credentials:
In the drop down menu, select API key:
Next, copy the key you just generated. Click Close.
Now save your key to an environment variable to avoid having to insert the value of your API key in each request.
In Cloud Shell run the following, replacing <your_api_key> with the key you just copied:
export API_KEY=<YOUR_API_KEY>
Create your Speech API request
Build your request to the Speech API in a request.json file in Cloud Shell:
touch request.json
Open the file using your preferred command line editor (nano, vim, emacs) or gcloud. Add the following to your request.json file, using the uri value of the sample raw audio file:
In config, you tell the Speech API how to process the request:
The encoding parameter tells the API which type of audio encoding you're using while the file is being sent to the API. FLAC is the encoding type for .raw files (here is documentation for encoding types for more details).
languageCode will default to English if left out of the request.
There are other parameters you can add to your config object, but encoding is the only required one.
In the audio object, you pass the API the uri of the audio file which is stored in Cloud Storage for this lab.
Now you're ready to call the Speech API!
Call the Speech API
Pass your request body, along with the API key environment variable, to the Speech API with the following curl command (all in one single command line):
{"results":[{"alternatives":[{"transcript":"how old is the Brooklyn Bridge","confidence":0.98267895}]}]}
The transcript value will return the Speech API's text transcription of your audio file, and the confidence value indicates how sure the API is that it has accurately transcribed your audio.
Notice that you called the syncrecognize method in our request above. The Speech API supports both synchronous and asynchronous speech to text transcription. In this example a complete audio file was used, but you can also use the syncrecognize method to perform streaming speech to text transcription while the user is still speaking.
Speech to text transcription in different languages
Are you multilingual? The Speech API supports speech to text transcription in over 100 languages! You can change the language_code parameter in request.json. You can find a list of supported languages here.
Let’s try a French audio file (listen to it here if you’d like a preview).
Edit your request.json and change the content to the following:
Now call the Speech API by running the curl command again.
You should see the following response:
{
  "results": [
    {
      "alternatives": [
        {
          "transcript": "maître corbeau sur un arbre perché tenait en son bec un fromage",
          "confidence": 0.9710122
        }
      ]
    }
  ]
}
This is a sentence from a popular French children’s tale. If you’ve got audio files in another language, you can try adding them to Cloud Storage and changing the languageCode parameter in your request.
Since you'll be using curl to send a request to the Speech API, you'll need to generate an API key to pass in our request URL.
To create an API key, click Navigation menu > APIs & services > Credentials:
Then click Create credentials:
In the drop down menu, select API key:
Copy the key you just generated.
Now that you have an API key, save it to an environment variable to avoid having to insert the value of your API key in each request. You can do this in Cloud Shell command line. In the following command, be sure to replace <YOUR_API_KEY> with the key you just copied.
export API_KEY=<YOUR_API_KEY>
Create your Speech API request
Create request.json in Cloud Shell command line. You'll use this to build your request to the speech API:.
touch request.json
Now open the request.json using your preferred command line editor (nano, vim, emacs) or gcloud. Add the following to your request.json file, using the urivalue of the sample raw audio file:
In config, you tell the Speech API how to process the request:
The encoding parameter tells the API which type of audio encoding you're using while the file is being sent to the API. FLAC is the encoding type for .raw files (here is documentation for encoding types for more details).
There are other parameters you can add to your config object, but encoding is the only required one.
In the audio object, you pass the API the uri of the audio file in Cloud Storage.
Now you're ready to call the Speech API!
Call the Speech API
Pass your request body, along with the API key environment variable, to the Speech API with the following curl command (all in one single command line):
{"results":[{"alternatives":[{"transcript":"how old is the Brooklyn Bridge","confidence":0.98267895}]}]}
The transcript value will return the Speech API's text transcription of your audio file, and the confidence value indicates how sure the API is that it has accurately transcribed your audio.
You'll notice that you called the syncrecognize method in the request above. The Speech API supports both synchronous and asynchronous speech to text transcription. In this example you sent it a complete audio file, but you can also use the syncrecognize method to perform streaming speech to text transcription while the user is still speaking.
You created an Speech API request then called the Speech API.
Since you'll be using curl to send a request to the Vision API, you'll need to generate an API key to pass in your request URL.
To create an API key, navigate to APIs & services > Credentials in your Cloud console:
Click on the Create credentials button.
In the drop-down menu, select API key.
Next, copy the key you just generated and save it to an environment variable to avoid having to insert the value of your API key in each request. Run the following, replacing <your_api_key> with the key you just copied:
export API_KEY=<YOUR_API_KEY>
Upload an Image to a Cloud Storage bucket
Creating a Cloud Storage bucket
There are two ways to send an image to the Vision API for image detection: by sending the API a base64 encoded image string, or passing it the URL of a file stored in Google Cloud Storage. We'll be using a Cloud Storage URL. The first step is to create a Google Cloud Storage bucket to store our images.
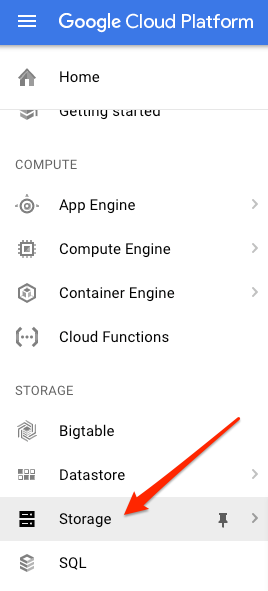
Navigate to Navigation menu > Storage in the Cloud console for your project, then click Create bucket.
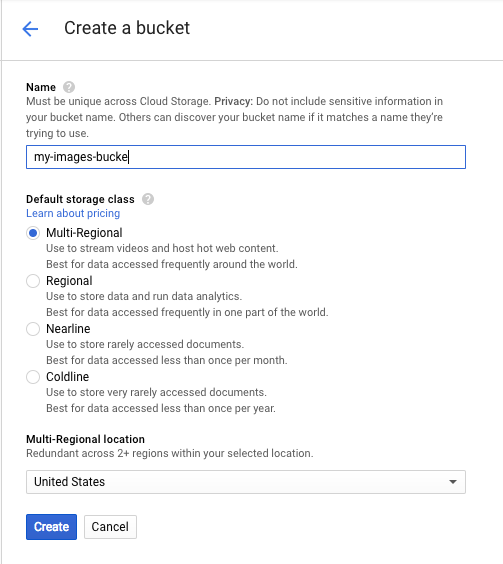
Give your bucket a unique name and click Create.
Upload an image to your bucket
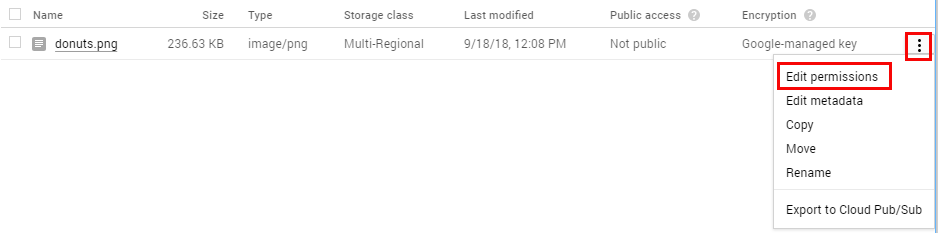
Right click on the following image of donuts, then click Save image as and save it to your computer as donuts.png.
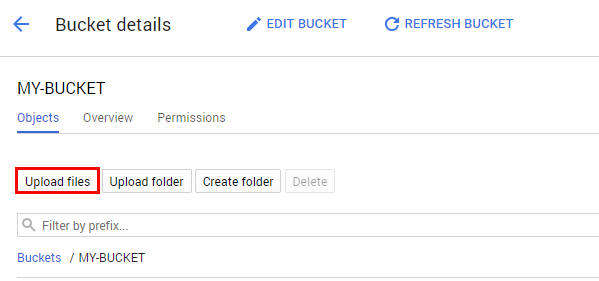
Go to the bucket you just created and click Upload files. Then select donuts.png.
You should see the file in your bucket.
Next, click on the 3 dots for your image and select Edit Permissions.
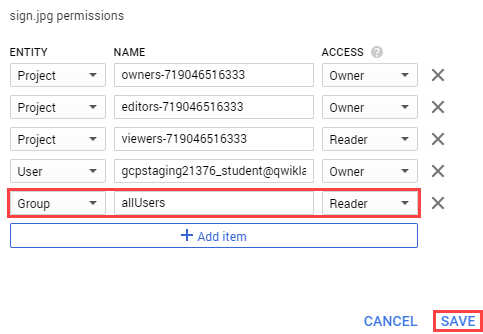
Click Add item then enter the followoing:
Entity: Group
Name: allUsers
Access: Reader
Then click Save.
Now that you have the file in your bucket, you're ready to create a Vision API request, passing it the URL of this donuts picture.
Create your Vision API request
Now you'll create a request.json file in the Cloud Shell environment.
Using gcloud (by clicking the pencil icon in the Cloud Shell ribbon),
or your preferred command line editor (nano, vim, or emacs), create a request.json file by running the following:
The API was able to identify the specific type of donuts these are, beignets. Cool! For each label the Vision API found, it returns a:
description with the name of the item.
score, a number from 0 - 100 indicating how confident it is that the description matches what's in the image.
mid value that maps to the item's mid in Google's Knowledge Graph. You can use the mid when calling the Knowledge Graph API to get more information on the item.
Web Detection
In addition to getting labels on what's in your image, the Vision API can also search the Internet for additional details on your image. Through the API's webDetection method, you get a lot of interesting data back:
A list of entities found in your image, based on content from pages with similar images
URLs of exact and partial matching images found across the web, along with the URLs of those pages
URLs of similar images, like doing a reverse image search
To try out web detection, use the same image of beignets and change one line in the request.json file (you can also venture out into the unknown and use an entirely different image).
Under the features list, change type from LABEL_DETECTION to WEB_DETECTION. The request.json should now look like this:
This image has been used in many presentations on Cloud ML APIs, which is why the API found the entities "Machine learning" and "Google Cloud Platform".
If you inpsect the URLs under fullMatchingImages, partialMatchingImages, and pagesWithMatchingImages, you'll notice that many of the URLs point to this lab site (super meta!).
Let's say you wanted to find other images of beignets, but not the exact same images. That's where the visuallySimilarImages part of the API response comes in handy. Here are a few of the visually similar images it found:
You can navigate to those URLs to see the similar images:
And now you probably really want a beignet(sorry)! This is similar to searching by an image on Google Images.
With Cloud Vision you can access this functionality with an easy to use REST API and integrate it into your applications.
Face and Landmark Detection
Next explore the face and landmark detection methods of the Vision API.
The face detection method returns data on faces found in an image, including the emotions of the faces and their location in the image.
Landmark detection can identify common (and obscure) landmarks. It returns the name of the landmark, its latitude and longitude coordinates, and the location of where the landmark was identified in an image.
Upload a new image
To use these two methods, you'll upload a new image with faces and landmarks to the Cloud Storage bucket.
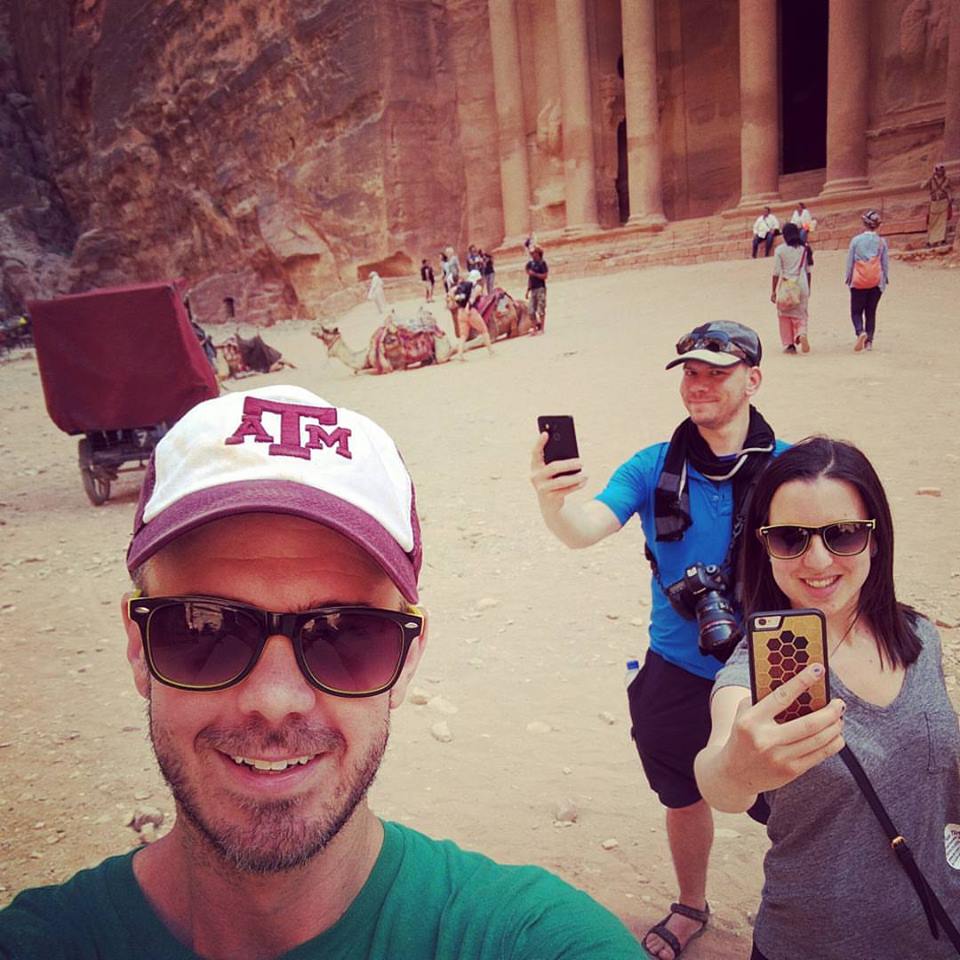
Right click on the following image, then click Save image as and save it to your computer as selfie.png.
Now upload it to your Cloud Storage bucket the same way you did before, and make it public.
Updating request file
Next, update your request.json file with the following, which includes the URL of the new image, and uses face and landmark detection instead of label detection. Be sure to replace my-bucket-name with the name of your Cloud Storage bucket:
Now you're ready to call the Vision API using the same curl command you used above:
curl -s -X POST -H "Content-Type: application/json" --data-binary @request.json https://vision.googleapis.com/v1/images:annotate?key=${API_KEY}
Take a look at the faceAnnotations object in the response. You'll notice the API returns an object for each face found in the image - in this case, three. Here's a clipped version of the response:
boundingPoly gives you the x,y coordinates around the face in the image.
fdBoundingPoly is a smaller box than boundingPoly, focusing on the skin part of the face.
landmarks is an array of objects for each facial feature, some you may not have even known about. This tells us the type of landmark, along with the 3D position of that feature (x,y,z coordinates) where the z coordinate is the depth. The remaining values gives you more details on the face, including the likelihood of joy, sorrow, anger, and surprise.
The response you're reading is for the person standing furthest back in the image - you can see he's making kind of a silly face which explains the joyLikelihood of POSSIBLE.
Next look at the landmarkAnnotations part of the response:
Here, the Vision API was able to tell that this picture was taken in Petra - this is pretty impressive given the visual clues in this image are minimal. The values in this response should look similar to the labelAnnotations response above:
the mid of the landmark
it's name (description)
a confidence score
The boundingPoly shows the region in the image where the landmark was identified.
The locations key tells us the latitude longitude coordinates of this landmark.
Explore other Vision API methods
You've looked at the Vision API's label, face, and landmark detection methods, but there are three others you haven't explored. Dive into the docs to learn about the other three:
Logo detection: identify common logos and their location in an image.
Safe search detection: determine whether or not an image contains explicit content. This is useful for any application with user-generated content. You can filter images based on four factors: adult, medical, violent, and spoof content.
Text detection: run OCR to extract text from images. This method can even identify the language of text present in an image.