Overview
Google Cloud Shell provides you with
gcloud command-line access to computing resources hosted on the Google Cloud Platform. Cloud Shell is a Debian-based virtual machine with a persistent 5GB home directory, which makes it easy for you to manage your GCP projects and resources. The Cloud SDK gcloud and other utilities you need come pre-installed in Cloud Shell, which allows you to get up and running quickly.
In this hands-on lab, you will learn how to connect to computing resources hosted on the Google Cloud Platform via Cloud Shell. You will learn how to use Cloud Shell and the
gcloud command.
We encourage students to type the commands themselves, to help encourage learning of the core concepts. Many labs will include a code block that contains the required commands. You can easily copy and paste the commands from the code block into the appropriate places during the lab.
What you'll do
- Practice using
gcloudcommands. - Connect to storage services hosted on the Google Cloud Platform.
Prerequisites
- Familiarity with standard Linux text editors such as
vim,emacs, ornano.
Setup
Before you click the Start Lab button
Read these instructions. Labs are timed and you cannot pause them. The timer, which starts when you click Start Lab, shows how long Cloud resources will be made available to you.
This Qwiklabs hands-on lab lets you do the lab activities yourself in a real cloud environment, not in a simulation or demo environment. It does so by giving you new, temporary credentials that you use to sign in and access the Google Cloud Platform for the duration of the lab.
What you need
To complete this lab, you need:
- Access to a standard internet browser (Chrome browser recommended).
- Time to complete the lab.
Note: If you already have your own personal GCP account or project, do not use it for this lab.
How to start your lab and sign in to the Console
- Click the Start Lab button. If you need to pay for the lab, a pop-up opens for you to select your payment method. On the left is a panel populated with the temporary credentials that you must use for this lab.
- Copy the username, and then click Open Google Console. The lab spins up resources, and then opens another tab that shows the Choose an account page.Tip: Open the tabs in separate windows, side-by-side.
- On the Choose an account page, click Use Another Account.
- The Sign in page opens. Paste the username that you copied from the Connection Details panel. Then copy and paste the password.Important: You must use the credentials from the Connection Details panel. Do not use your Qwiklabs credentials. If you have your own GCP account, do not use it for this lab (avoids incurring charges).
- Click through the subsequent pages:
- Accept the terms and conditions.
- Do not add recovery options or two-factor authentication (because this is a temporary account).
- Do not sign up for free trials.


After a few moments, the GCP console opens in this tab.
Activate Google Cloud Shell
Google Cloud Shell is a virtual machine that is loaded with development tools. It offers a persistent 5GB home directory and runs on the Google Cloud. Google Cloud Shell provides command-line access to your GCP resources.
- In GCP console, on the top right toolbar, click the Open Cloud Shell button.
- In the dialog box that opens, click START CLOUD SHELL:

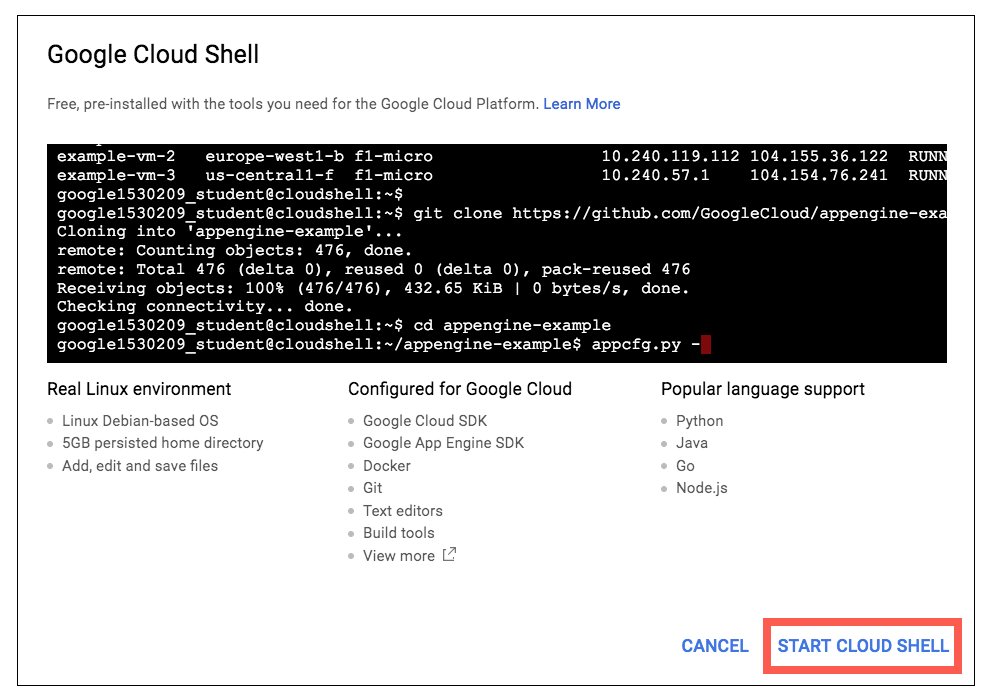
It takes a few moments to provision and connect to the environment. When you are connected, you are already authenticated, and the project is set to your PROJECT_ID. For example:

gcloud is the command-line tool for Google Cloud Platform. It comes pre-installed on Cloud Shell and supports tab-completion.
You can list the active account name with this command:
gcloud auth list
Output:
Credentialed accounts:
 - <myaccount>@<mydomain>.com (active)
Example output:
Credentialed accounts:
 - google1623327_student@qwiklabs.net
You can list the project ID with this command:
gcloud config list project
Output:
[core]
project = <project_ID>
Example output:
[core]
project = qwiklabs-gcp-44776a13dea667a6Understanding Regions and Zones
Certain Compute Engine resources live in regions or zones. A region is a specific geographical location where you can run your resources. Each region has one or more zones. For example, the us-central1 region denotes a region in the Central United States that has zones
us-central1-a, us-central1-b, us-central1-c, and us-central1-f.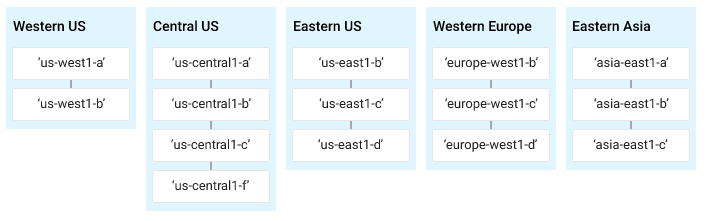
Resources that live in a zone are referred to as zonal resources. Virtual machine Instances and persistent disks live in a zone. To attach a persistent disk to a virtual machine instance, both resources must be in the same zone. Similarly, if you want to assign a static IP address to an instance, the instance must be in the same region as the static IP.
Use the command line
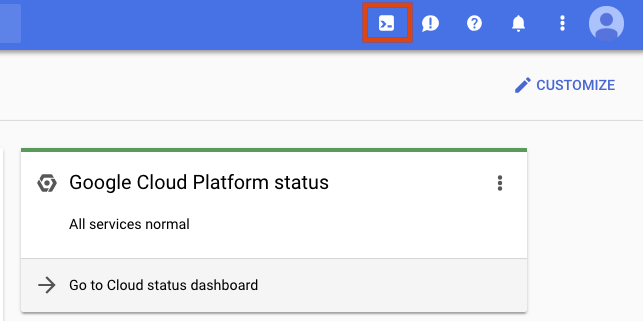
Open a new Cloud Shell session by clicking on the icon in the top right corner of the GCP Console:
After Cloud Shell is activated you can use the command line to invoke the Cloud SDK
gcloud command or other tools available on the virtual machine instance. You can also use your $HOME directory in persistent disk storage to store files across projects and between Cloud Shell sessions. Your $HOME directory is private to you and cannot be accessed by other users.
Let's take a look at some of the commands available.
gcloud offers simple usage guidelines that are available by adding the -h flag onto the end of any gcloud invocation. Run the following command in Cloud Shell:gcloud -h
More verbose help can be obtained by appending
--help flag, or executing gcloud help command. Run the following in Cloud Shell:gcloud config --help
Press use the enter key or the spacebar to scroll through the help content. Press
q to exit the content. Now run the following command:gcloud help config
You can see that the
gcloud config --help and gcloud help config commands are equivalent. Both give long, detailed help.Use your home directory
Now let's try out your home directory. The contents of your Cloud Shell home directory persists across projects between all Cloud Shell sessions, even after the virtual machine terminates and is restarted.
Change your current working directory:
cd $HOME
Open your
.bashrc configuration file using vi.vi ./.bashrc
The editor opens and displays the contents of the file. Press the
ESC key and then :q to exit the editor.Using gcloud commands
Let's view the list of configuration in our environment. From reading the long, detailed help results in the previous step, we know we can use the command
gcloud list.gcloud config list
To check how other properties are set, see all properties by calling:
gcloud config list --allManaging Cloud Storage data
You can use the
gsutil tool in Cloud Shell to manage Cloud Storage resources. This includes creating and deleting buckets and objects, copying and moving storage data, and managing bucket and object ACLs. gsutil will also let you transfer data in and out of your Cloud Shell instance.
Try creating a Cloud Storage bucket. Bucket names must be unique, so replace
unique-name with something else, or append the name to make it unique.gsutil mb gs://unique-name
Now we'll create some data to upload to your bucket.
First, create a test file:
vi test.dat
Start the editor:
i
Add some data to your file:
Welcome to gcloud!
Save the test.dat file: <ESC>, then
:wq
Now upload some data to the bucket you created (make sure to replace "unique-name" with your storage bucket):
gsutil cp test.dat gs://unique-name
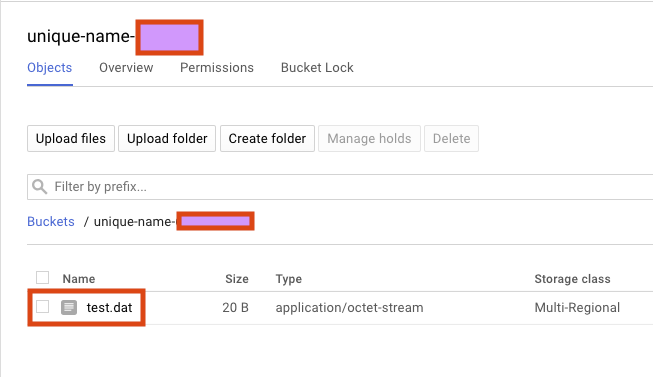
To see your bucket and file, open the navigation menu and select Storage > Browser. Then click on your bucket. You should see the test.dat file:
vi test.datiWelcome to gcloud!test.dat file: <ESC>, then:wqgsutil cp test.dat gs://unique-nametest.dat file:


 (photo from psychologytoday.com)